
McEagle Styrofoam Glider
SUBJECT: Aeronautics
TOPIC: Gliding Flight
DESCRIPTION: Plans for building a high-performance glider out of
Styrofoam food trays and packages.
CONTRIBUTED BY: Norm Poff, OSU
EDITED BY: Roger Storm, NASA Lewis Research Center
MATERIALS:
Styrofoam meat tray or
Styrofoam breakfast tray from McDonalds or other fast-food restaurants
Exacto TM Knife
White glue
Sand paper, fine grade or emery board
Double sided cellophane tape (optional)
Scissors
Marker Pen
Cellophane tape
Dime

PROCEDURE:
1. Cut out the pattern pieces and join the fuselage pieces end-to-end.
CLICK
HERE TO GET TEMPLATE SHEET TO PRINT
2. Cut two long rectangles slightly larger than the fuselage
pattern from the flat surface of the Styrofoam meat tray. Laminate the
Styrofoam pieces with double - sided tape or glue together and press. If
gluing, lightly roughen the contact surfaces with sand paper or emery board
to improve adherence. (Balsa wood may be substituted for the fuselage.)
3. Lay the pattern pieces for the wings, stabilizer, and fin
on flat surfaces of the Styrofoam tray. Trace the patterns and cut out
each piece with the Exacto knife. Be sure to protect your table top. Also
cut out the fuselage piece from step 2. Label the forward direction on
each piece. Lay the fuselage pattern on the laminated Styrofoam piece you
made in step 2 and trace and cut.
4. Glue the fin, and stabilizer to the fuselage at the places
indicated in the plans. Lightly roughen the contact surfaces to improve
adherence. Refer to the diagram for placement.
5. Before gluing the wings, divide them in two along the cut
line. Lightly sand the the upper and lower surfaces of the wings to a width
of about 1 cm along the cut lines.
6. Lay a bead of glue along the upper edge of the fuselage in
the indicated place. Touch wings pieces together again and set on top of
the glue bead. Using books or some other support, elevate the wing tips
about 2.5 cm (1 in) higher than the middle to form a dihedral angle (see
diagram). 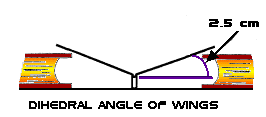 Lay
another bead of glue along the top of the cut line and smooth with your
finger. Let the glue dry for all pieces before continuing.
Lay
another bead of glue along the top of the cut line and smooth with your
finger. Let the glue dry for all pieces before continuing.
BALANCING McEAGLE:
When the McEagle is dry, temporarily tape the dime to one side of the
fuselage at a point just behind the leading edge of the wings. Toss the
glider and observe its flight. If the plane climbs too steeply, move the
dime slightly forward. If the plane dives too steeply, move the dime backward.
Try to achieve a gentle glide. Permanently mount the dime with tape when
satisfied with the glide. Make adjustments to McEagle's right or left movements
by slightly warping the rear edge of the fin in the opposite direction
.
DISCUSSION:
McEagle achieves a smooth, gliding flight through its design and through
balancing adjustments made when mounting the dime . The dihedral angle
of the wings provides stability against rolling in flight by concentrating
wing lift above the fuselage where the plane's center of gravity is located.
This keeps the wings up and the fuselage down. The fins of McEagle are
mounted at a slight negative angle to the plane of the wings. This produces
a slight negative lift in the airplane's tail that helps bring the nose
up to recover from dives produced during stalls. Adjustments to the position
of the dime changes the front-to-back location of McEagie's center of gravity.
If too far forward, the plane will be nose-heavy and dive steeply. If too
far back, the plane will be tail-heavy and will climb steeply, lose air
speed, and stall.
 A
BRIEF HISTORY OF GLIDERS
A
BRIEF HISTORY OF GLIDERS
THE PAPER AIRPLANE
PAGE
PICTURES
OF GLIDERS AND SOARING
 BACK TO AERONAUTIC ACTIVITIES INDEX PAGE
Aerospace Education Services Project
Oklahoma State University
Please send any comments to:
Carol Galica ( Carol.A.Galica@lerc.nasa.gov)
Beth Lewandowski (b.lewandowski@meson.lerc.nasa.gov)