Make a Flying Wing!
This quick and fun activity comes from Model Aviation
Magazine and the Academy of Model Aeronautics. It was
submitted to their June 1997 issue by Paul Billings of Niota, Tennessee,
with original artwork by Julie Anne Visco. It is presented here with
permission, in slightly modified form.
What You Need
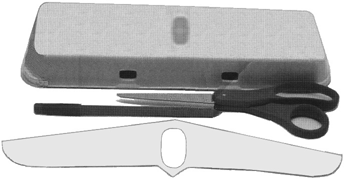
- The lid from a one-dozen-size styrofoam egg carton
- Wing template
- Scissors or razor knife
- Pen
- Penny
- White glue
NOTE: You'll need Acrobat Reader to print out this
template. You can get it (free) here.
Make sure Reader is NOT set to "Fit to Page" in print window,
since this must print out at exactly the right size. Also, our
Windows-using readers have advised us: When printing, specify
"Print as image" as opposed to "Print as file." |
|
|---|
What You Do
|
|---|
 |
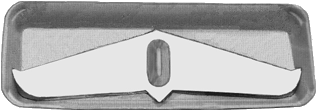
- Cut out the wing template, including the hole in the center.
- Place the template on the inside of the carton lid, with the
hole fitting over the center hump. You will NOT cut out this
hump! The hole in the template is just to allow it to fit over
the hump, which will form the "cargo bay" of your flying wing.
- Trace around the template with a pen. Then cut along that line.
Note that the wingtips will curve with the lid edges.
- Wedge a penny in the front of the cargo bay (the side
without the pointed protrusion).
- Use a few drops of white glue to hold the penny in place and
wait for it to dry.
|
Flying It!
Holding by the cargo bay with the penny in front, give
it a good toss! Adjusting the speed and angle of your toss will allow
different maneuvers. This wing flies really well, so allow lots of
room!